Before a month ago, I have written some articles about Angular JS. I have explained about Directives and Custom Directives in one those article which you can see here. Last Saturday I have attended a seminar which was about Directives and custom Directives in Angular JS. So, Sharing my learning experience with my readers.The session was conducted by Tech Enthusiast and JavaScript Expert Hardik Patel of RapidOps Solutions Pvt. Ltd. (www.rapidops.com).
Angular JS is MVC structure which is basically useful for data binding from view to controller and controller to view.I have explained basic about Angular JS on my previous article.You can learn How to get started with Angular JS.
What is Directive in Angular JS?
The directive is a unique and powerful feature available in Angular JS.
The directive is a used to manipulate the DOM elements through the framework with a simple declarative syntax which simplifies DOM operation logic.
The directive is a reusable an independent component which can perform the specific action. Like you have certain directives so whenever includes that particular element to execute template along execute a function.
For Example, You want to create the custom tag like date picker in HTML so using jQuery or another library, you can not create the custom Tags in HTML whereas Angular JS provides such functionality which is known as Directives.
You can write if, switch condition or loop in HTML using the directive in Angular JS. The directive provides the behavior driven Development so they basically change the behavior of html attribute.
Why Directives?
As we discussed, Directives are the heart and soul of Angular JS which makes angular JS different from the other JavaScript Frameworks.There are many key features of directives which we will see in this article.The directive is a powerful tool that can be used to manipulate and modify the DOM.
What is Custom Directive in Angular JS?
As per the definition of the directive, It is a code fragment which you can use to manipulate the DOM. Custom Directive is the reusable component to extend the basic HTML element.It is used to change the behavior of the HTML attribute and add some attributes.
Declarative:
In jQuery, You want to bind any element, you will use the id or class and write the code.But you have used element or class and the same element apply to your parent scope which can create conflict in your jQuery code. So using Declarative in Angular JS, You can declare the element or attribute which can be easily located and find.
Modularize:
Whenever you are using MVC framework, You might need code re-usability with which you can easily utilize the code whenever you want in your or other application. For example, plugin, you just plug and play with it which reduce the development time for the same functionality.
You can create the module in Angular JS which will work like copy and paste. So, You can write code once in your application using the module and in case you want to use same the code in another application, You just need to copy and paste that file in that application. That’s it. Your functionality will start to work.
Reusable approach of the context:
This is the best feature of Angular JS. For example, Suppose you have some stores and you want to list out your store list in a page. So, You just need to create HTML snippet and directive for that HTML snippet. Next, pass data and paste the directive code into the HTML element or attribute and your functionality will start working with few lines of code.
Keep it Global
When you are working with JavaScript, your global functionality which is directly written in DOM ready, it is global and it might create the issue if you want to make some changes at a local scope.
In Angular JS, You have created a directive, and you can use the element or attribute at many places in your file without affecting another scope. Directive maintains the local scope for the element. Whenever you change the data, the directive will change the local scope.It will not affect the another or parent scope.
In-Built Directives
Angular comes with a set of built Directives.There are so many built in directives in Angular JS. Let’s see the in built Directives:
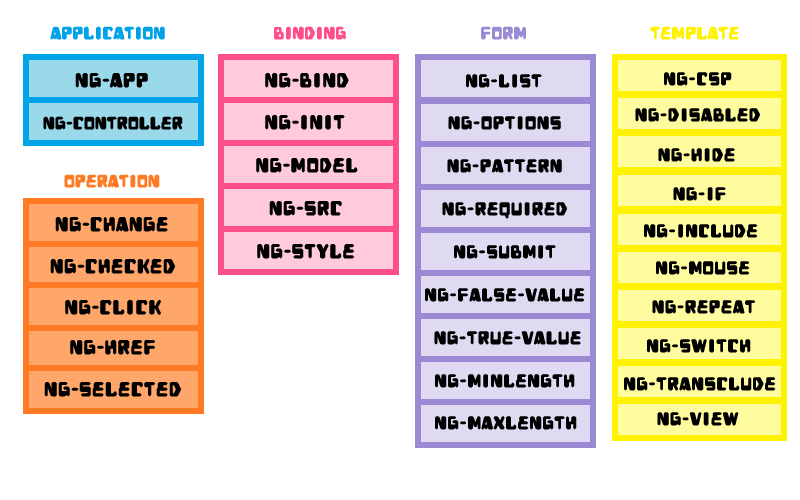
You might have used one of the above directives if you have developed the single application or example using Angular JS.
Types of Directives
There are four types of directives in Angular JS. Here is the list of directives.
- Element: You can create your own HTML tag or element. It
- Attribute:
- Class:
- Comment:
Example:
1 2 3 | <my-dir></my-dir> |
You can create your own attribute in HTML tag. For example, You can create your own attribute in jQuery using data attribute. If you don’t have an idea about data element in HTML5. Read our article: How to Use HTML5 Data Attributes.
So, Same like this you can create any custom attribute.
Example
1 2 3 | <div my-dir>Hello World</div> |
You can pass the custom HTML element as the class and use that element as per your requirement.
Mostly, Don’t prefer to use the class and comment directives, because the older version of Internet Explorer (IE) does not support the directives.
How to Create Directives in Angular JS?
You can create directives in Angular JS using the .directive() method and this method accept the two arguments.
- Directive Name
- Config Object : It is also known as the Directive Defination Object (DDO).
First is the name of the directive and second is the configuration function defines the behavior of the directive.
Invoke Directives:
- Naming Conventions: Naming Convention helps to understand the structure of your declaration. Angular JS have following types of Naming Conventions supported.
- camelCase Identifier: It is mandatory to use camelCase format for declaring a directive or creating directive Name. if you not follow this convention, directive will not render HTML in your Angular JS.
For Example, Here My directive name is “myDirective” so I have written it in camelCase.
123.directive('myDirective'),function(){{});
1 2 3 4 5 6 7 | ng:directivename (ng:model) ng-directivename (ng-model) ng_directivename (ng_model) x-ng-directivename (x-ng-model) data-ng-directivename (data-ng-model) |
You can use : (colon), – (hyphen), _ (underscore), x, data, any convention from above to declare the directive. I recommend to use the ng-directivename, as it is commonly used.
Directive Configuration options
Inject Dependencies: You want to inject the timeout of HTTP request or you are making ajax call in the function.
DDO (Directive Definition Object): Basically, Directive have Link function and if you don’t want to go with link function, You can use DDO.
Directive Parameters:
Now, let’s understand the set of parameters directive support.
- Restrict (EAC):
- ‘E’ (element) – matches element name
- ‘A’ (attribute) – matches attribute name.
- ‘C’ (class)- matches class name.
- ‘M’ (comment) – matches with comments.
- Priority:
- Replace:
- Template/TemplateURL:
- Link Function:
- Scope: Scope passed to the directive. There are three types of scope which will see later in this article.
- Element: You can find the DOM object which contain the property of DOM.
- Attribute: Object containing the HTML attribute and values.
- Controller: Reference to inherited controller Object(optional).
You can restrict your directive with the restrict property where you can restrict with element, attribute, controller or model. Whatever value you use in restrict property, directive will be restricted to that specific directive.
Here is the option for Restrict and It defines how the directive can be used:
where the default value is A.
As an element:
1 2 3 | <my-dir></my-dir> |
As an attribute:
1 2 3 | <div my-dir></div> |
As a class:
1 2 3 | <div class=" my-dir: expression;"></div> |
As a comment:
1 2 3 | <!-- directive: my-dir expression --> |
Priority is a concept to set the order of execution. Suppose, You have two or three directives in your page and your one directive is dependent on another directive. To wait for the first directive to complete and then start the next directive, you can set the priority.
So, When multiple directives defined at the same DOM element and you want to create their execution order. At that time, Priority is useful
Default value for priority is zero(0). Highest priority(999) executed first.
When you want to replace element or attribute, you can pass the true else it will append the data.
True: Replace the current element with the template.
False: Append the directive to the current element
Template is used for adding the inline HTML string or element in double or single quote Whereas TemplateUrl is used to load the HTML from the external or internal file.
Template is faster than the TemplateUrl so if you have around 3 – 4 lines of HTML code, use the template else it is better to use the TemplateUrl. TemplateUrl is best for binding HTML for large no of HTML tags.
Link function is used for attaching the event listener to DOM element, watching model properties for changes and updating the DOM.You can easily bind the events(mouse over, click, etc) using link function.
Basically, Link function will deals with the DOM elements whenever you apply the property to the event listener.
SYNTAX:
Syntax of link function is
1 2 3 | function link(scope, element, attrs, controller) { ... } |
Link function accept the four arguments:
After all this explanation, Let’s start with the examples which will clear all your
Element Example
First, I will show you an example how you can use restrict and template in Angular JS.Let’s dive into the code first.Here is the Javascript snippet
Here, I will create simple directive using element property.
JAVASCRIPT
1 2 3 4 5 6 7 8 9 10 | (function () { angular.module('app',[]).directive('useInfo',function(){ return { restrict: 'E', template: '<p>Hello World!</p>' } }); })(); |
In this, I have first used the angular module and with that passed .directive() method and as I said it accept two parameters. So, Here first is the name of the directive which is userInfo and second is the function which have restrict and HTML template.
Now, Let’s see the HTML snippet which is very simple code:
HTML
1 2 3 | <user-info></user-info> |
Here, I am explaining about custom directives so it is kind of custom tag in HTML. So, As defined in the directive() method, you can that directive name in HTML to display the template.
Attribute Example
Next, If you want to use directive as HTML attribute,You can declare HTML like below:
HTML
1 2 3 | <div user-info></div> |
And change the restrict in the angular js code, Let me show the code to understand how it works
JAVASCRIPT
1 2 3 4 5 6 7 8 9 10 | (function () { angular.module('app',[]).directive('useInfo',function(){ return { restrict: 'AE', template: '<p>Hello World!</p>' } }); })(); |
In above code, I have added A in restrict to allow attribute as the directive in Angular JS.In example restrict ‘AE’ indicates that instructions are are declared in the DOM as the element and attribute.
After this, Next I will show you how you can use directive in your HTML element like explained in the following example:
Class Example:
HTML
1 2 3 | <span class ="user-info"></span> |
In above code, I have used HTML span tag and in that created a class which is “user-info”. Now, you want to see it in action so it is time to see the JS code.
JAVASCRIPT
1 2 3 4 5 6 7 8 9 10 | (function () { angular.module('app',[]).directive('useInfo',function(){ return { restrict: 'AEC', template: '<p>Hello World!</p>' } }); })(); |
In above JS code, I have just added one more restrict option which is for the controller so it will allow you to replace the element value in HTML elements or attributes.
Scope:
In Angular JS, Controller is responsible for routing the various requests and return the response to the view and stick to the model and the view whereas view is bound to provide a model is known as scope in Angular JS.
There are three types of scope
Types of Scope:
- Shared Scope: Scope contain by controller,that scope will be shared with directive.
- Inherited Scope: Scope of controller, will be inherited to directive. $scope as true in property DDO, whatever changes made is directive that will not be reflect in controller.
- Isolated Scope: It is very important scope in Angular JS. It is used to create the isolate scope for each instance of the directive.Isolate scope is a way to pass individual things from the parent scope to the directive scope without inherit.123Example, scope: {}
It has three parameters:
- @ ( At-The-Rate) – The value of the attribute will be passed to the property line of Scope Directive.
- = (equal to) – Directive scope property will bind to the object named in the attribute for two way binding.
- & (Ampersand) – This Directive property will interprets the function expression contained in the attribute.&(Ampersand) is used to bind the parent scope and the attaching the property into a function such as string or array of objects.
1 2 3 | Example, scope: false |
1 2 3 | Example, scope: true |
I will take one by one example of each:
1.Shared Scope:
When the new directive initialized with the scope property as false, the directive has the same scope as its parent which is known as Shared Scope.
JAVASCRIPT
Until now, I have not used the scope in any example, Now I will show you the example with the scope.
1 2 3 4 5 6 7 8 9 10 11 12 13 14 15 16 17 18 19 20 21 22 23 24 25 26 | (function() { angular.module('app', []).controller('MainController', function($scope) {console.log($scope); $scope.user = { name: 'Bhumi Shah', address: { street: 'P---', city: 'Ahmedabad', }, friends: [ 'Tim', 'Max', 'Kerry' ] } }).directive('userInfo', function() { return { restrict: 'AEC', templateUrl: 'user-info.html', scope: false, controller: function($scope) { console.log($scope); } } }); })(); |
You can see the create the angular module. Here, I have used templateUrl so for that, you need to pass the path of the file and create the file in the specific folder. Here, I have passed false for the scope which is the default value of scope and it is known as shared scope where works directly at the controller scope.
Here, The scope user contains the three properties which si name, address and friends. Also, address contains the properties which are street and city.
Next, will display the name parameter using the directive is very simple. just user object and then the property within in double curly braces expression like,{{user.name}}.
HTML
1 2 3 4 5 6 7 | <body ng-app="app"> <div ng-controller = "MainController"> <user-info></user-info> </div> </body> |
DIRECTIVE (Template file code)
1 2 3 4 5 6 7 8 9 10 11 12 13 14 15 | <div class="row"> <div class="col-sm-6 col-sm-offset-2"> <div class="panel panel-success"> <div class="panel-heading"> <h3 class="panel-title">{{user.name}}</h3> </div> <div class="panel-body"> {{user.address.street}} {{user.address.city}} </div> </div> </div> </div> |
Here is the whole HTML that contain the user object data. Same like name you can display all the property very easily using curly braces. For displaying friends, you can use the ng-repeat.
2. Inherited Scope:
Now, In above example change the value of scope property to true, it will inherit the property of controller.If the scope is set to true, it will create the new scope of the directive.
Let me show you screenshot of inspected elements:
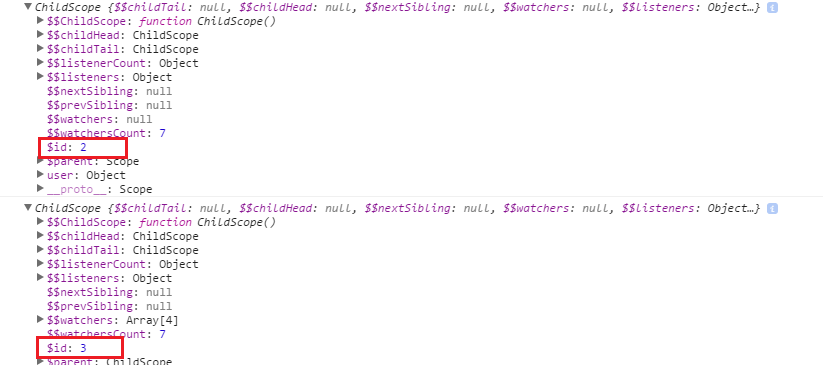
As you can see in the screenshot, both controller and directive have different id whereas if you set scope: false, id will be same.
3. Isolated Scope:
When using isolate scope, the scope will be set as {} (Object hash) which will create a new and isolated scope of the directive. The difference between “Isolate” scope and general scope is, it is not inherited by the parent scope.This is helpful to create reusable components. it can effectively prevent the parent to read or modify the scope of the data. This independent scope would create local scope attribute of the object hash.
For explaining the isolate scope in Angular JS, I come with the collapse and expand panel example.Before you know how it works, let’s see the code and understand it.
HTML
In HTML part, I have added one controller which is MainController into the div and then in that div used user-info custom tag which will use the directive.
1 2 3 4 5 6 7 | <body ng-app="app"> <div ng-controller = "MainController"> <user-info user="user" collapsed ="true"></user-info> </div> </body> |
DIRECTIVE
Now, I will show you the directive part which contain HTML element with curly braces variables to display dynamic values of the user. Also, Here I have used the bootstrap panel but you can use any tags and CSS. In this directive part, I have taken ng-click directive to panel-heading with function collapsedCard(); so when user clicks on panel heading, it will call this function.
Next, Assign the ng-show to the panel-body as I am going to toggle the body part of the panel so that used ng-show with variable collapsedState and will change the value through the Javascript
1 2 3 4 5 6 7 8 9 10 11 12 13 14 15 16 17 18 19 20 | <div class="row"> <div class="col-sm-6 col-sm-offset-2"> <div class="panel panel-success"> <div class="panel-heading" ng-click = "collapsedCard();"> <h3 class="panel-title">{{user.name}}</h3> </div> <div class="panel-body" ng-show="collapsedState"> <b>ADDRESS</b><br/> {{user.address.street}} <br/> {{user.address.city}}<br/><br/> <b>FRIENDS</b><br/> <ul> <li ng-repeat="friend in user.friends">{{friend}}</li> </ul> </div> </div> </div> </div> |
JAVASCRIPT
Here is the Javascript code of Angular JS where controller contains the user object information which I am displaying in HTML.The scope is using the @, it will always return as string.Also, passing the user: ‘=’ in scope for the two-way binding because = (equal to) is used for two-way binding in Angular JS.
1 2 3 4 5 6 7 8 9 10 11 12 13 14 15 16 17 18 19 20 21 22 23 24 25 26 27 28 29 30 31 32 33 34 35 36 37 | (function() { angular.module('app', []).controller('MainController', function($scope) { $scope.user = { name: 'Bhumi Shah', address: { street: 'P---', city: 'Ahmedabad', }, friends: [ 'Tim', 'Max', 'Kerry' ] } }).directive('userInfo', function() { return { restrict: 'AEC', templateUrl: 'user-info.html', scope: { user: '=', collapsed: '@' }, controller: function($scope) { $scope.collapsedCard = function() { console.log($scope); $scope.collapsedState = !$scope.collapsedState; }, $scope.collapsedState = ($scope.collapsed === 'true') $scope.$watch('user', function(newVal, oldVal) { console.log('test ' +newVal+' test ' +oldVal); return newVal; }); } } }); })(); |
In this example, ng-click function triggers the show the panel by the template and a model of the object called as the name parameter passed into it, but in html, we show the value of the property is set to collapsed.
Here is the link of above demo.
Here is the in-depth explanation of what I learned on Saturday session.Hope you like this article, Share great stuff with your friends and colleagues & Do subscribe to my blog for more interesting stuff through the right top text box.
What are your thoughts regarding Directives in Angular JS? Which method will you use to for custom directives in Angular JS? If I missed any point, just let me know in the comments section.






Comments (2)